Remington RM4625 Betreibershandbuch
Stöbern Sie online oder laden Sie Betreibershandbuch nach Mini-Bodenfräsen Remington RM4625 herunter. Remington RM4625 Operator`s manual Benutzerhandbuch
- Seite / 48
- Inhaltsverzeichnis
- FEHLERBEHEBUNG
- LESEZEICHEN
- Operator’s Manual 1
- SAFETY WARNINGS FOR GAS UNITS 2
- SPARK ARRESTOR NOTE 2
- SAVE THESE INSTRUCTIONS 3
- KNOW YOUR UNIT 5
- SPECIFICATIONS* 5
- ASSEMBLY 6
- OIL AND FUEL 7
- STARTING AND STOPPING 8
- OPERATION 9
- MAINTENANCE 10
- IDLE SPEED ADJUSTMENT 11
- AIR FILTER MAINTENANCE 11
- REPLACING THE SPARK PLUG 12
- CLEANING AND STORAGE 13
- TROUBLESHOOTING 14
- REMINGTON LLC 16
- Manuel de L’utilisateur 17
- SÉCURITÉ 18
- CONSERVEZ CES INSTRUCTIONS 19
- SPÉCIFICATIONS* 21
- ASSEMBLAGE 22
- HUILE ET CARBURANT 23
- DÉMARRAGE ET ARRÊT 24
- UTILISATION 25
- ENTRETIEN 26
- AJUSTEMENT DU RALENTI 27
- ENTRETIEN DU FILTRE À AIR 27
- REMPLACEMENT DE LA BOUGIE 28
- NETTOYAGE ET ENTREPOSAGE 29
- RÉSOLUTION DES PROBLÈMES 30
- REMARQUES 31
- Manual del Operador 33
- SEGURIDAD 34
- GUARDE ESTAS INSTRUCCIONES 35
- CONOZCA SU UNIDAD 37
- ESPECIFICACIONES* 37
- ENSAMBLAJE 38
- ACEITE Y COMBUSTIBLE 39
- ARRANQUE Y PARADA 40
- OPERACIÓN 41
- MANTENIMIENTO 42
- 0.025 in 44
- (0.635 mm) 44
Inhaltsverzeichnis
Operator’s Manual2-Cycle Gas CultivatorRM4625TABLE OF CONTENTSService . . . . . . . . . . . . . . . . . . . . . . . . . . . . . . . . . . . . . . . .
10MAINTENANCETINE REMOVAL AND REPLACEMENT NOTE: All installation instructions are explained from the operatingposition.All 4 tines should be replaced
11IDLE SPEED ADJUSTMENTNOTE: Careless adjustments can seriously damage your unit. Anauthorized service dealer should make carburetor adjustments.If af
12REPLACING THE SPARK PLUG1. Stop the engine and allow it to cool. Grasp the spark plug wirefirmly and pull the cap from the spark plug.2. Clean dirt
13CLEANING AND STORAGECLEANING Use a small brush to clean the outside of the unit. Do not use strongdetergents. Household cleaners that contain aromat
14TROUBLESHOOTINGIf further assistance is required, contact an authorized service dealer.The fuel tank is empty Fill the fuel tank with properly mixed
15NOTES
The limited warranty set forth below is given by Remington LLC (Remington) with respect to new merchandise purchased and used in theUnited States, its
Manuel de L’utilisateurCultivateur de Jardin á 2-tempsRM4625TABLE DES MATIÈRESService . . . . . . . . . . . . . . . . . . . . . . . . . . . . . . . .
18SÉCURITÉ• CONSIGNES DE SÉCURITÉ IMPORTANTES •NOTE SUR LE PARE-ÉTINCELLESREMARQUE : à l’intention des utilisateurs sur les terrainsforestiers américa
19AVERTISSEMENTS DE SÉCURITÉ POUR LES APPAREILSÀ GAZ• Stockez le carburant uniquement dans des récipientsspécifiquement conçus à cet usage et approuvé
2SAFETYSAFETY WARNINGS FOR GAS UNITS• Store fuel only in containers specifically designed and approvedfor the storage of such materials.• Always stop
20• SYMBOLES DE SÉCURITÉ ET INTERNATIONAUX •Le présent manuel de l’opérateur décrit les symboles et pictogrammes de sécurité et internationaux, suscep
Levierd'étranglementManette des gazPoignée supérieureBoutons depoignéePoired'amorçageCouvercle dufiltre à airBougieTraind’engrenagesPoignée
22ASSEMBLAGEPOSITIONNEMENT DES POIGNÉES1. Desserrez les deux boutons à l’intérieur des poignées (Fig. 3).2. Tenez l'appareil droit et placez les
23REMPLIR LE RÉSERVOIR DE CARBURANT1. Placer l’appareil de façon à ce que le bouchon du réservoir decarburant soit au-dessus.2. Retirer le bouchon du
24DÉMARRAGE ET ARRÊTINSTRUCTIONS DE DÉMARRAGE1. Mélanger l’essence et l’huile. Consulter les Instructions demélange de l’huile et de l’essence.2. Remp
25TRANSPORT DE L’APPAREIL1. Arrêtez le moteur.2. Inclinez l’appareil vers l’arrière jusqu’à ce que les dents décollentdu sol.3. Poussez ou tirez l’app
26ENTRETIENRETRAIT ET REMPLACEMENT DES DENTSREMARQUE : Toutes les instructions d’installations sont décritesdu point de vue de la position d’utilisati
27AJUSTEMENT DU RALENTIREMARQUE : des réglages non soigneux peuvent endommagersérieusement l'appareil. Les réglages de carburateur doiventêtre fa
28REMPLACEMENT DE LA BOUGIE1. Arrêtez le moteur et laissez-le refroidir. Saisissez fermement lecâble de bougie et retirez le capuchon de celle-ci.2. N
29NETTOYAGE ET ENTREPOSAGENETTOYAGE Utilisez une petite brosse pour nettoyer la partie externe del’appareil. N’utilisez pas un détergent fort. Les pro
3WHILE OPERATING• Wear safety glasses or goggles that meet current ANSI Z87.1standards and are marked as such. Wear ear/hearing protectionwhen operati
30RÉSOLUTION DES PROBLÈMESSi vous avez besoin d’une aide supplémentaire, veuillez contacter un revendeur agréé.Le réservoir de carburant est vide Remp
31REMARQUES
GARANTIE LIMITÉE DU FABRICANT POUR:La garantie limitée énoncée ci-après est accordée par Remington LLC et concerne les marchandises neuves achetées et
Manual del OperadorCutivador de 2 Ciclos a GasolinaRM4625TABLA DE CONTENIDOServicio . . . . . . . . . . . . . . . . . . . . . . . . . . . . . . . . .
34SEGURIDAD• INSTRUCCIONES DE SEGURIDAD IMPORTANTES •NOTA SOBRE EL AMORTIGUADOR DE CHISPASNOTA: Para usuarios de los territorios de bosques de EE. UU.
35ADVERTENCIAS DE SEGURIDAD PARA LAS UNIDADES A GASOLINA• Almacene el combustible únicamente en recipientes diseñadosespecíficamente y aprobados para
36• SÍMBOLOS INTERNACIONALES Y DE SEGURIDAD •Este manual del operador describe símbolos de seguridad e internacionales, así como pictogramas, que pued
Palanca delobturadorControl del reguladorManija superiorPerillas delmanubrioBombilla delcebadorCubierta delfiltro de aireBujía deencendidoCaja de engr
38ENSAMBLAJECOLOCACION DEL MANUBRIO1. Afloje las dos perillas del lado interior del manubrio (Fig. 3).2. Con la unidad en posición vertical, gire el m
39ABASTECER DE COMBUSTIBLE LA UNIDAD1. Coloque la unidad con la tapa del tanque de combustiblemirando hacia arriba.2. Quítele la tapa al tanque.3. Col
4• SAFETY & INTERNATIONAL SYMBOLS •This operator's manual describes safety and international symbols and pictographs that may appear on this
40ARRANQUE Y PARADAINSTRUCCIONES DE ARRANQUE1. Mezcle la gasolina con el aceite. Consulte Instrucciones paramezclar el aceite y el combustible.2. Llen
41CONSEJOS PARA LA OPERACION1. Transporte el cultivador hacia el área de trabajo antes de arrancar elmotor. Consulte Mover la unidad.2. Arranque la un
42MANTENIMIENTOREMOCION Y REPOSICION DE LAS PUASNOTA: Todas las instrucciones de instalación se explican desde laposición de funcionamiento. Las 4 púa
43AJUSTE DE LA VELOCIDAD DE MARCHA EN VACÍONOTA: Los ajustes realizados sin cuidado pueden dañar seriamentesu unidad. Los ajustes del carburador deben
44CAMBIO DE LA BUJIA DE ENCENDIDO1. Apague el motor y espere que se enfríe. Tome el alambre de labujía con firmeza y sáquelo de la bujía de encendido.
45LIMPIEZA Y ALMACENAMIENTOLIMPIEZA Use un cepillo pequeño para limpiar el exterior de la unidad. Noutilice detergentes fuertes. Los productos de limp
46LOCALIZACIÓN Y SOLUCIÓN DE PROBLEMASSi necesita asistencia adicional, comuníquese con un distribuidor de servicio autorizado.El depósito de combusti
47NOTAS
Remington LLC concede la garantía limitada establecida debajo para mercancías nuevas que sean compradas y usadas en los EstadosUnidos, sus posesiones
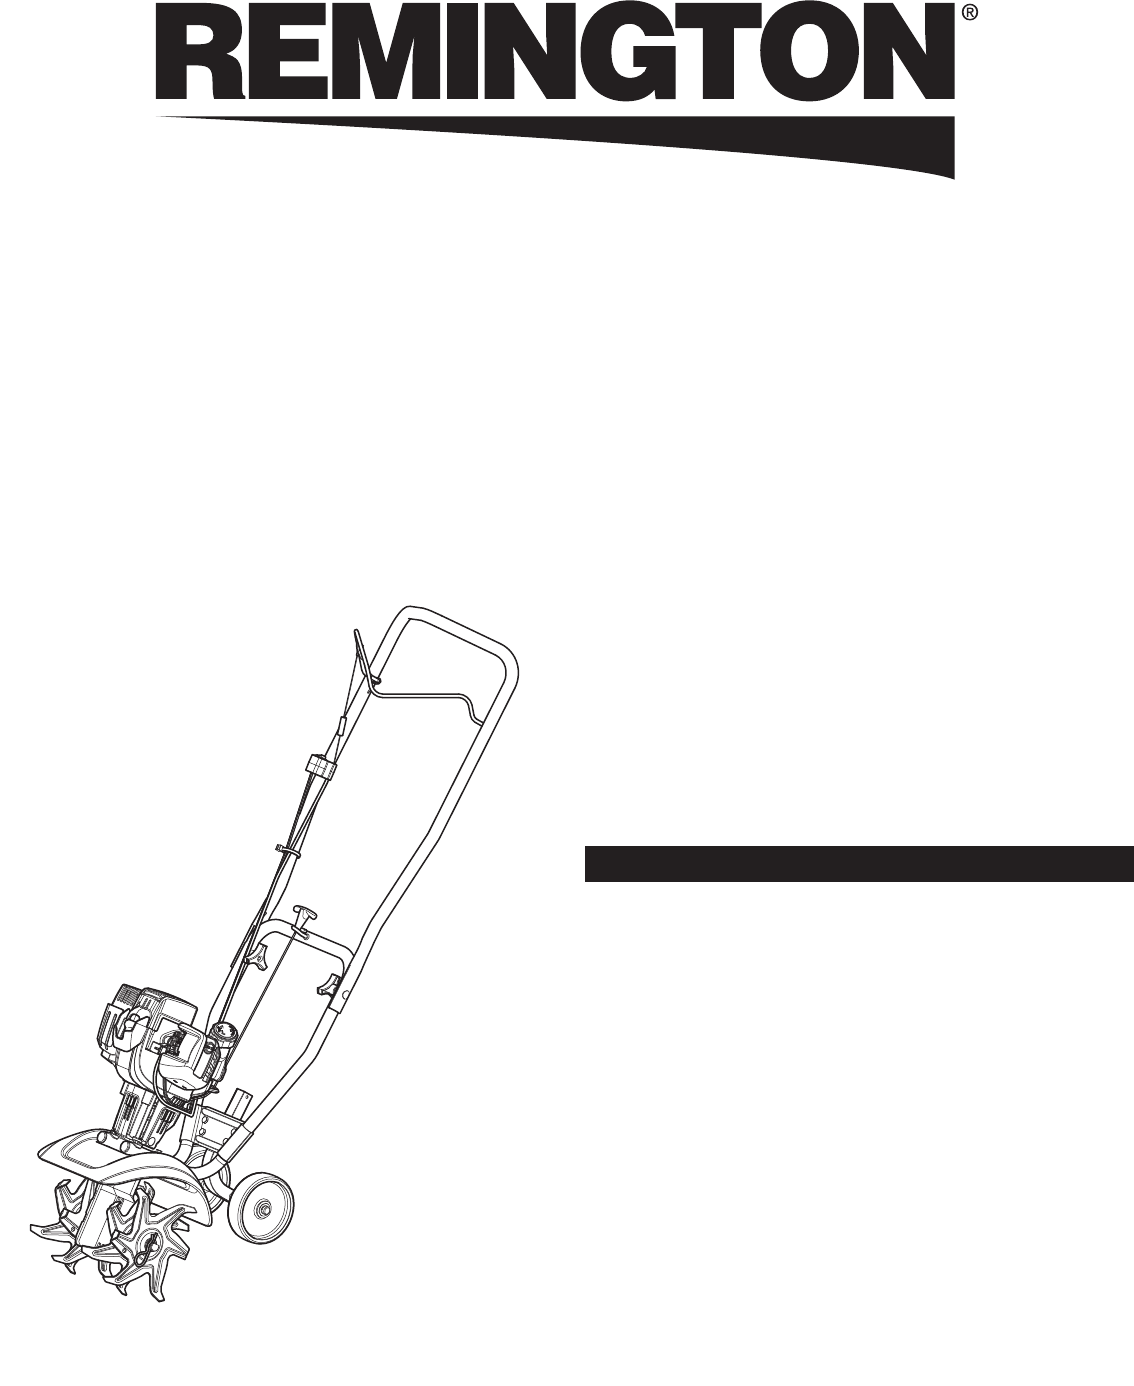
5KNOW YOUR UNITAPPLICATION• Cultivating sod and light to medium soil• Cultivating in garden areas, around trees, etc.Choke LeverThrottle ControlUpper
6INSTALLING AND ADJUSTING THE WHEEL ASSEMBLYInstalling the Wheel Assembly1. Set the unit on its side (Fig. 1).2. Insert the wheel assembly into the wh
7FUELING THE UNIT1. Position the unit with the fuel cap facing up.2. Remove the fuel cap.3. Place the fuel container spout into the fill hole on the f
8STARTING AND STOPPINGSTARTING INSTRUCTIONS1. Mix gasoline with oil. Refer to Oil and Fuel Mixing Instructions.2. Fill the fuel tank. Refer to Fueling
9MOVING THE UNIT1. Stop the engine.2. Tilt the unit back until the tines clear the ground.3. Push or pull the unit to the next location.ADJUSTING THE
Weitere Dokumente für Mini-Bodenfräsen Remington RM4625


Verwandte Produkte und Handbücher für Mini-Bodenfräsen Remington RM4625


 (48 Seiten)
© 2020, manymanuals.de. Alle Rechte vorbehalten. | 1.293 s |
 Manymanuals.com
 Manymanuals.de
 Manymanuals.fr
 Manymanuals.it
 Manymanuals.pl
 Manymanuals.cz
 Manymanuals.es
 Manymanuals-pt.com
Kommentare zu diesen Handbüchern